


Understand how to construct simple shapes and turn them into full game-ready houses and scenes
Master isometry from scratch

We’ll show you how a real game development pipeline works. What you’ll create isn’t just «a study drawing, ” but a real production-style project
Learn the studio workflow

Your mentor will guide you step by step, support you,
and help you move confidently through each stage
and help you move confidently through each stage
You won’t be alone
Why you’ll love this course

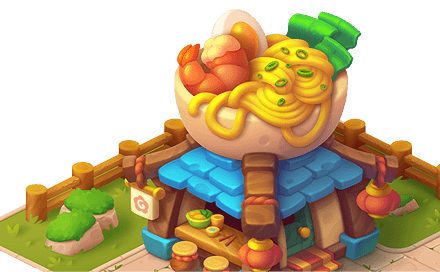
Go from sketch to final render and end up with a finished portfolio piece - a cozy house and its environment!
Create your first isometric object
Course Program

Block 1: Introduction
In the first week, you’ll learn what types of isometric objects are used in games.
We’ll go over simple forms and grids — the foundation you’ll need for further progress.
You’ll learn how to build a scene with an isometric grid, which simplifies complex shapes and boosts your confidence for real projects.
Topics: Overview, grid creation, shapes, sketching by hand using the grid
Topics: Overview, grid creation, shapes, sketching by hand using the grid
Block 2: Concept Development
In this section, you'll learn how to develop isometric concepts. We'll discuss how to use references and structure your ideas. You'll understand how to transform real-world objects into stylized ones and what to consider when designing new shapes. This will help you create cool and original projects in the future.
Topics: Idea Generation, Form and Design, Casual Stylization, Concept Development
Topics: Idea Generation, Form and Design, Casual Stylization, Concept Development
Block 3: Casual Color
You'll learn how color influences the character of an image and master the basics of color harmony. We'll explore how to choose the right palette and how to work with pure colors in shadows and highlights. Through hands-on practice, you'll strengthen your color skills and learn to use references and associative palettes to achieve expressiveness in an image.
Topics: Color Wheel and Palettes, Working with Casual Color, Concept in Color
Topics: Color Wheel and Palettes, Working with Casual Color, Concept in Color
Block 4: Lighting and Tone
In this step, we'll dive into working with lighting and volume. You'll learn how to set up lighting at different angles. We'll work on tone and understand cast shadows. You'll also be reinforcing the theory, focusing on light and shadow, right from the first stage of rendering your house! ❤️
Topics: Lighting Types, Occlusion and Form, Initial Rendering and General Volumes
Topics: Lighting Types, Occlusion and Form, Initial Rendering and General Volumes
Block 5: Materials
It's time to continue working on the render, adding textures and polishing our house. You'll learn how to apply casual textures, work on ambient occlusion, and improve lighting and contrast. This will help make your work more vibrant and expressive.
Topics: Materials, Casual Textures, Finalizing
Topics: Materials, Casual Textures, Finalizing
Block 6: Final Project
In this part of the course, you'll dive into your thesis. We'll discuss why project design is so important for your portfolio and personal satisfaction. We'll create an attractive design with a thematic theme and a description of your work. We'll also show you how to create a presentation for ArtStation or Behance so your work looks professional and attracts attention. 😊
Topics: The Role of Presentation, Portfolio Style, Project Design, Creating a Cover for Platforms
Topics: The Role of Presentation, Portfolio Style, Project Design, Creating a Cover for Platforms
ALIS A.
I absolutely loved the isometry course! The lessons were clear,
the homework was fun, and the feedback was incredibly helpful. Not a single minute was wasted — I’m proud of my results! Thank you, Redby Art, for this amazing experience!
the homework was fun, and the feedback was incredibly helpful. Not a single minute was wasted — I’m proud of my results! Thank you, Redby Art, for this amazing experience!
KONSTANTIN K.
The “Isometric Workshop” was my first serious project - not only in isometry
but in game art in general. I was surprised how quickly I managed to reach a satisfying result,
even though choosing the right design decisions wasn’t always easy. Much of my success came from my fantastic mentor, Ekaterina!
but in game art in general. I was surprised how quickly I managed to reach a satisfying result,
even though choosing the right design decisions wasn’t always easy. Much of my success came from my fantastic mentor, Ekaterina!
ANNA B.
I had never tried drawing in isometric view before and was scared at first -
but this course turned that fear into excitement! We started with simple shapes and gradually built up to a full scene. Everything was explained clearly, and the feedback was amazing. Highly recommend this course, especially if you’ve been afraid to start!
but this course turned that fear into excitement! We started with simple shapes and gradually built up to a full scene. Everything was explained clearly, and the feedback was amazing. Highly recommend this course, especially if you’ve been afraid to start!
LYUDMILA A.
I always wanted to try drawing an isometric house but kept putting it off.
This course finally helped me do it — and I loved the process!
The explanations were detailed, and the mentor guided me through every step.
Now I have a finished piece I’m proud of!
Why Take This Course?
Show real, polished isometric work in your portfolio and boost your chances during interviews!
Get that dream job offer

Employers value artists who can create strong isometric game assets - it’s a skill that opens many doors
High demand in the market
Think spatially and build 3D forms confidently
Learn the basics and start creating concepts
Frequently Asked Questions
6 weeks (plus an additional month to submit the final project). Even if you miss the deadline, you'll have time to finish the work and get feedback from your mentor.
On average, 2-3 hours per task is enough to create a basic foundation. If you want to further refine and improve the project, you can add more time. Even 15-30 minutes a day is already progress.
Yes, you can. But keep in mind: some Photoshop features are missing, such as the vector pen. The main thing is that the final files can be opened correctly in Photoshop.
Preferred. It's best to take the course after "2D Artist" or have a foundation in color and shapes. We'll be step-by-step, and the instructor is always available to help if you're having trouble.
Adobe Photoshop (or Procreate), graphics tablet (even a budget one will do)
on average 45 minutes per week :)
Don't panic. Even if you're behind schedule, you'll have extra time (+1 month) to calmly finish the project and get a review from your supervisor.
Yes, after completing the course you will receive a Redby Art certificate <3
+ Bonus Lesson:
Creating Environments
Creating Environments
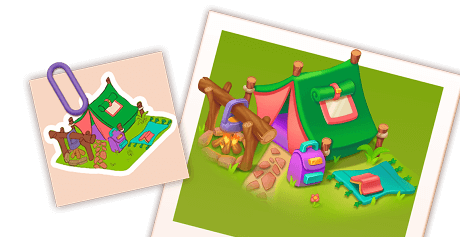
In this bonus lecture, we’ll go through how to create isometric tiles for environments and learn how to make seamless textures.
You’ll also discover how to use asset reuse for efficient work.
These skills will help you improve your projects and make them look more professional.


Leave your contact info
and we’ll get in touch
and we’ll get in touch
Have a question?

STILL HAVE QUESTIONS?
Don’t wait - message us right now in the way that’s most convenient for you!
We’re always happy to help 💌
Join our community!
Instagram

Pinterest

Apply on the website
© All Rights Reserved. redbyschool@mail.ru
2025
BUY COURSE

Duration: 6 weeks (+1 bonus month)
360 $